Last updated
How to Move a Google Doc into WordPress Without Broken Images
Three ways to import a Google Doc into WordPress so its images end up in your media library instead of linking to Google's image cache.


Google Docs is where a lot of content gets drafted, reviewed and approved. Getting that content into WordPress cleanly is harder than it looks, and images are where it usually goes wrong.
The biggest problem is the one you cannot see. When you copy a Google Doc and paste it into the WordPress editor, the images look fine, but they are still hosted on Google’s servers, not in your WordPress media library.
Warning: images pasted from a Google Doc point at Google’s image cache (
googleusercontent.com) rather than at files on your site. Those links are not files you own and they can stop working, and when they do, the images in your post break. Whichever method you use, make sure every image ends up in your WordPress media library.
This guide covers three ways to import a Google Doc into WordPress:
- Method 1: paste the doc into Workover, which keeps the images, then push it to WordPress.
- Method 2: download the doc as a web page and rebuild it in the block editor.
- Method 3: use the Mammoth .docx converter plugin.
Method 1: Paste into Workover, then push to WordPress
Workover is a writing and publishing workspace that connects to your WordPress site. You paste the Google Doc into a Workover document, and Workover copies each pasted image into its own storage so the images no longer depend on Google. When you push the document to WordPress, the images are uploaded to your media library along with the post.
Workover does not sync with Google Docs. Once the content is pasted in, you edit it in Workover, and changes you make later in the Google Doc are not carried across.
Before you start: you need a Workover account, a project connected to your WordPress site, and a WordPress login that can approve the connection. If the site is not connected yet, follow Connecting your WordPress site to Workover, or use the short version in step 2.
- Sign in to Workover at workover.io/app/login, or create an account there.
- If your project is not connected to WordPress yet, open its Project settings. In the Connect to WordPress card, enter your site’s address, for example
https://example.com, without/wp-admin/appended, and click Connect. - WordPress asks you to log in if you are not already, then shows its application authorization screen. Click Yes, I approve of this connection.
- In Google Docs, select the whole document (Ctrl+A, or Cmd+A on a Mac) and copy it.
- Open a document in your Workover project and paste. The text and images appear straight away, and Workover copies the images into its own storage in the background.
- Review the content. To set an image’s file name or alt text, select the image and click Edit in its toolbar. See Images and media.
- Open the WP tab in the editor’s side panel and push the document to WordPress. The button follows the status you pick: Save draft to WordPress for a draft, Send for review, Publish or Save as private. See How to push a document to WordPress.
- To check the result, click the Open in WordPress icon in the same tab.
If an image could not be copied, Workover shows a message after the paste, for example “One pasted image still links to its original source and may expire.” Re-insert that image from a file before you push.
If you run into problems, email [email protected].
Method 2: Download the Google Doc as a web page
This method gets your images out of Google as real files, but you rebuild the post by hand.
- Open the document in Google Docs.
- Click File > Download > Web Page (.html, zipped). This downloads the document as a zip file.
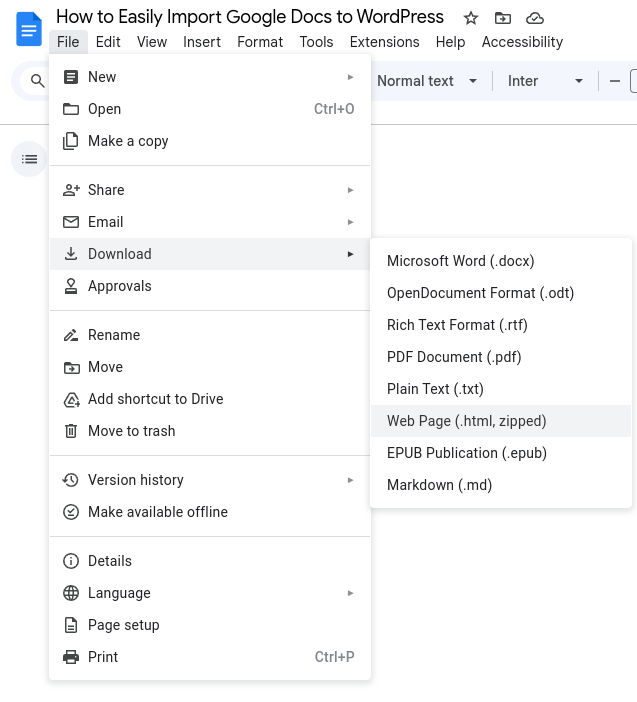
- Extract the zip file to a folder. It contains the page as an HTML file, and the document’s images as separate image files.
- Open the HTML file in a text editor and copy everything between the
<body>tags. - In WordPress, go to Posts > Add Post.
- Switch the editor to the Code editor and paste the copied HTML.
- Switch back to the visual editor. Because the pasted HTML has no block markup, WordPress shows it as a single Classic block. Select that block and click Convert to blocks in its toolbar, so each image becomes its own Image block.
- Rename the extracted image files to descriptive file names if you want to.
- For each image, select the Image block, click Replace, choose Upload, and pick the matching file from the extracted folder. This uploads it to your media library and replaces the link to Google.
- Add alt text to each image, then set categories, tags and any other post settings.
- Preview the post, then publish or save it.
This takes more steps than the other methods, but you control every block of the result.
Method 3: Use the Mammoth .docx converter plugin
The Mammoth .docx converter plugin converts a .docx file into editor content, and uploads the document’s images to your media library when it inserts them.
- In WordPress, go to Plugins > Add Plugin, search for “Mammoth .docx converter”, click Install Now, then Activate.
- In Google Docs, click File > Download > Microsoft Word (.docx).
- In WordPress, go to Posts > Add Post and give the post a title.
- In the post editor, find the Mammoth .docx converter box and use its file field to select the .docx file.
- Click Insert into editor.
- Review the converted content and fix any formatting problems.
- Publish or save the post.
Mammoth’s own documentation says the conversion is unlikely to be perfect for more complicated documents, and that it works best when the document uses styles such as headings, so budget time for cleanup.
Which method to choose
| Method | Images end up in your media library | Effort |
|---|---|---|
| Paste into Workover, then push | Yes, uploaded on push | Low, after a one-time site connection |
| Download as web page | Yes, when you replace each image | High, manual rebuild |
| Mammoth .docx converter | Yes, uploaded when you insert | Medium, cleanup needed |
| Copy and paste into WordPress | No, images stay on Google’s servers | Low, but images can break later |
Related
Stop pasting drafts into your CMS.
Write, review and publish in one place, then let Monitor watch every page after it goes live.